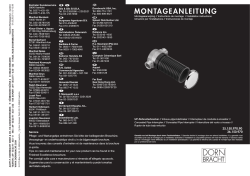
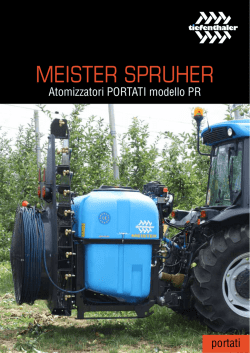
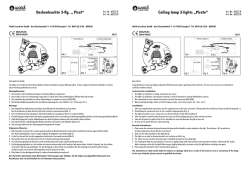
IT
ICEGLOBE 33/33L/33M/33SM
VillaTosca Design
ATTENZIONE
The safety of the fitting is guaranteed by the
correct use of the following instructions. It is
therefore necessary to keep them.
Tutte le operazioni di montaggio,
manutenzione e sostituzione lampadine,
vanno eseguite assicurandosi che la rete di
alimentazione sia disinserita.
When carrying out all assembly, maintenance
and lamp replacement operations, make sure
that the power is off.
AVVERTENZA
L'installazione deve essere effettuata da
installatori qualificati nel pieno rispetto
della normativa.
ISTRUZIONI DI MONTAGGIO
Ø 57 cm
Ø 45 cm
Ø 57 cm
F
0.3 m
HALOGEN Energy Saver
ICEGLOBE 33
ICEGLOBE 33L
ICEGLOBE 33M
ICEGLOBE 33SM
1 x max 70W E27
1 x max 70W E27
1 x max 105W E27
1 x max 105W E27
230 V 50Hz
Compact FLUORESCENT
1 x max 24W E27
1 x max 24W E27
1 x max 27W E27
1 x max 27W E27
MADE IN ITALY
LUMEN CENTER ITALIA s.r.l.
Via Donatori del Sangue 37
20010, S. Stefano Ticino (Mi) Italy
tel: +39.02.36544811 - fax: +39.02.36544818
e-mail: [email protected]
www.lumencenteritalia.com
ATTENTION
La sicurezza dell'apparecchio é garantita
all'osservanza di queste istruzioni pertanto
si raccomanda di conservarle.
Non deve essere superata la potenza
massima indicata.
Ø 30 cm
EN
Do not exceed the maximum power
indicated.
WARNING
The fitting should be installed by qualified
installers to comply with the HD 384
standards.
ASSEMBLY INSTRUCTION
FISSAGGIO LAMPADA DECENTRATO
SUPPORTS EXT. TO THE CELLING CASE
1) Fissare gli elementi a soffitto (F) mediante
l'apposito tassello ad espansione (FIG.1).
2) Fissare l'attacco a muro (A) mediante gli
appositi tasselli ad espansione (FIG.1).
3) Fissare il corpo lampada tramite il
fermacavo a frizione (E). Quindi regolarne
l'altezza (FIG.1+FIG.4).
4) Effettuare i collegamenti elettrici
connettendo i cavi di alimentazione (dopo
averli protetti con l'apposita guaina) al
morsetto rispettando lo schema riportato sul
retro di questo foglio (FIG.3).
5) Chiudere il rosone con il finale (FIG.1).
1) Fix elements (F) to ceiling-rose, using
expansion plugs (FIG.1).
2) Fix wall attachment (A) to the wall using
expansion plugs (FIG.1).
3) Secure the lamp body through the friction
cable clamp (E). Adjust the cable length
(FIG.1+FIG.4)
4) For electrical connections insert the feeder
cables into the clamp (after protecting them
with the proper sleeve) following the format
found on the back of this leaflet (FIG.3).
5) Fix the cover (FIG.1).
FISSAGGIO LAMPADA A ROSONE
SUPPORT ON THE CEILING CASE
1) Fissare l'attacco a muro (A) mediante gli
appositi tasselli ad espansione (FIG.2).
2) Sospendere il corpo della lampada facendo
passare il cavo metallico nel nel fermacavo
(E1) e regolarne l’altezza. Tagliare il cavo
metallico in eccesso (FIG.4a).
3) Effettuare i collegamenti elettrici
connettendo i cavi di alimentazione (dopo
averli protetti con l'apposita guaina) al
morsetto lo schema riportato sul retro di
questo foglio (FIG.3).
4) Chiudere il rosone con il finale (FIG.2).
1) Fix elements to wall (A), using expansion
plugs (FIG.2)
2) Suspend the body of the lamp by passing
the wire cable in the cable clamp (E1) and
adjust the cable length. Cut the excess wire
cable (FIG.4a).
3) For electrical connections insert the feeder
cables into the clamp (after protecting them
with the proper sleeve) following the format
found on the back of this leaflet (FIG.3).
4) Fix the cover (FIG.1).
FISSAGGIO DIFFUSORE
1) Inserire la lampadina (FIG.5).
2) Mettere nella sfera (diffusore) il corpo
lampada, fino all'aletta (G).
3) Bloccare il corpo lampada avvitando
il finale (D).
DE
ACHTUNG
Die Sicherheit des Gerates ist nur
garantiert wenn die folgenden Vorschriften
eingehalten werden. Es ist daher notwendig
diese aufzubewahren.
FR
ATTENTION
La sureté de l'appareil est garantie avec
l'utilisation appropriée des instructions
suivantes. Il est donc nécessaire de les garder.
Montage, Wartung und Lampenwechsel
durfen nur nach Unterbrechung des
Netz anschlusses durchgeführt werden.
Toutes les opérations de montage, entretien
et remplacement de l'ampoule ne doivent
etre effectuées qu'après avoir coupé le
courant.
Nie die höchste angegebene Leistung
überschreiten.
Il ne faut pas dépasser la puissance maximum
indiquée.
SICHERHEITSHINWEISE
Die Leuchte ist von qualifizierten
Fachleuten im Einklang mit der Bestimmung
HD 384 zu installieren.
MONTAGEANLEITUNGEN
BEFESTIGUNG DER LEUCHTE AUßEN DER
DECKENROSE
1) Elemente (F) den Decken unter Verwendung
der entsprechenden Dübel befestigen (Bild 1)
2) Wandverankerung (A) an der Wand unter
Verwendung der entsprechenden Dübel
befestigen (Bild 1)
3) Danach den Körper der Leuchte durch
Kabelhalter (E) befestigen. Die Länge einstellen
(Bild 1 + Bild 4)
4) Die elektrischen Anschlüsse werden
hergestellt, indem die Speisekabel, die zuerst
durch den Kabelmantel geschützt werden
müssen an die Klemme angeschlossen werden.
(siehe Rückseite - Bild 3)
5) Die Abdeckung fixieren (Bild1).
BEFESTIGUNG DER LEUCHTE AN DER
DECKENROSE
AVERTISSEMENT
L'installation doit être effectuée par des
installateurs agréés, conformément à la
norme HD 384.
INSTRUCTION DE MONTAGE
FIXATION LAMPE DÉCENTRÉE
1) Fixer les élements (F) au plafond au
moyen des chevilles à expansion prévues (fig.
1).
2) Fixer l’attache murale (A) au moyen des
chevilles à expansion prévues (fig. 1).
3) Fixer le corps de la lampe au moyen de
l’élément (E), ensuite regler l’hauteur (fig.
1-fig.4).
4) Effectuer les connections électriques en
connectant les cables d’alimentation à la
borne après les avoir protégés au moyen de
la gaine spéciale (fig. 3), sélon le schéma
indiqué au verso de cette fiche (fig. 3).
5) Serrer la rosace avec l’élement final (fig.
1).
FIXATION DE LA LAMPE À LA ROSACE
1) Elemente (A) der Wand unter Verwendung
der entsprechenden Dübel befestigen (Bild 2)
2) Die Lampenkörper an die Decke hängen.
Kabel aus Metal im Kabelhalter einstecken.
Nachher die Länge einstellen. Schneiden den
übrigen Teil (Bild 4A)
3) Die elektrische Anschlüsse werden
hergestellt, indem die Speisekabel, die zuerst
durch den Kabelmantel geschützt werden
müssen an die Klemme angeschlossen werden
(siehe Rückseite - Bild 3)
4) Die Abdeckung fixieren.
1) Fixer l’attache murale (A) au moyen des
chevilles à expansion prévues (fig. 2).
2) Souspendre le corps de la lampe en
faisant passer le cable en métal dans le
serre-cable (E1) et en regler l’hauteur.
Couper le cable en métal en excès. (fig. 4a).
3) Effectuer les connections électriques en
connectant les cables d’alimentation à la
borne (après les avoir protégés au moyen de
la gaine spéciale), sélon le schema indiqué au
verso de cette fiche (fig. 3).
4) Serrer la rosace avec l’élément final (fig.
2).
FIXING OF DIFFUSER
BEFESTIGUNG DER DIFFUSOR
FIXATION DU DIFFUSEUR
1) Insert the bulb (FIG.5).
2) Put the lamp body into the sphere
(diffuser) as far as the tongue (G).
3) Lock the body lamp by screwing the final
element (D).
1) Die Glühbirne einschrauben
2) Lampekörper im Diffusor auf Teil G
einstellen
3) Lampekörper unter Verwendung der
Schlussteil (D) befestigen (BILD 6)
1) Insérer l’ampoule (fig. 5).
2) Mettre dans la sphère (diffuseur) le corps
de la lampe, jusq’au petit disque (G).
3) Bloquer le corps de la lampe en vissant
l’élement final (D).
VillaTosca Design
ICEGLOBE 33/33L/33M/33SM
L
1
2
A
A
N
F
L
N
Wall
Lamp
3
E
E
E1
D
D
4
G
G
CUT
6
IT - Il simbolo riportato sull'apparecchio indica che il prodotto
5
4a
EN - The sign shown on the device indicates that the product must
be thrown out in a different manner than with the urban trashes.
DE - Das auf dem Gerät wiedergegebene Symbol zeigt an, dass das
Produkt getrennt vom Stadtüll entsorgt werden muss.
FR - Le symbole montré sur l'appareil indique que le produit doit être
éliminé d'une autre façon que celle avec les déchets urbains.
© Copyright 2026 Paperzz