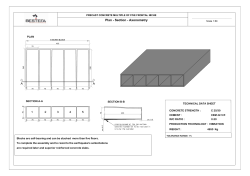
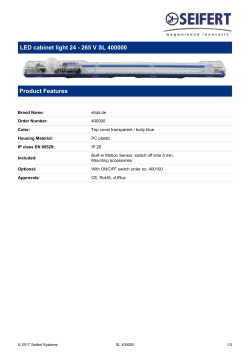
Stepping Stone
Additional Parts Required:
Mounting Post/Plate
(4) 3/8" x 1" Bolts & Washers
Step 1 —
Prepare a hole suitable for installing an 18" (45.7 cm)
long piece of 12" (30.5 cm) Sonotube. Set the
section of Sonotube into the hole and place fill
around the Sonotube. Fill the Sonotube with
concrete and set the 2" (5 cm) mounting pipe into the
concrete.
Mounting Pipe
Mounting Plate
Step 2 —
When the concrete has set, place the Stepping
Stone onto the 2" (5 cm) mounting pipe and secure
to the mounting plate using 3/8" x 1" bolts.
2" (5 cm)
Mounting Pipe
Suitable Depth
of Surfacing
(ie. Sand, Bark, etc.)
Mounting Plate
Concrete
Dug Hole
12" (30.5 cm)
Sonotube
3/8" x 1"
Mounting Bolts
12" (30.5 cm)
Sonotube
18"
(45.7 cm)
Fill
Concrete
Soil
Soil
Step 3 —
Mounting Plate Template —
Place a sufficient amount and type of surfacing
around the Stepping Stone to ensure compliance
with CSA/ASTM guidelines.
There is one off-centre molded-in insert on the foot
of the Stepping Stone. To accommodate for the
variances in the positioning of the threaded inserts
on the base of the Stepping Stone, we recommend
1/2" clearance holes as shown.
Stepping Stone
i1 15/16"
(i4.9 cm)
4 7/8"
(12.4 cm)
4"
(10 cm)
Suitable Depth
of Surfacing
(ie. Sand, Bark, etc.)
3/16" - 1/4"
Mounting Plate
recommended
i1/2"
(i1.3 cm)
Soil
4" (10 cm)
4 7/8" (12.4 cm)
Copyright © 2001 - 2017
SPI Industries Inc. All rights reserved
Printed in Canada
Box 100, R.R.#2
Shallow Lake, ON N0H 2K0 Canada
[T] 800-269-6533 or 519-935-2211
[F] 519-935-2174
[email protected]
www.spiplastics.com
R 7/16
Installation Instructions
Supplied Parts: Stepping Stone
Stepping Stone
Installation Instructions
Stepping Stone — Ground Steps
Stepping Stone — Suspended Steps
Box 100, R.R.#2
Shallow Lake, ON N0H 2K0 Canada
[T] 800-269-6533 or 519-935-2211
[F] 519-935-2174
[email protected]
www.spiplastics.com
© Copyright 2026 Paperzz